Tight Drawing
Have you ever struggled with creating tight clothing on your character drawings? It can be a frustrating and tedious process, but the end result can make a huge difference in the overall look and feel of your artwork. In this article, we will explore the art of tight drawing and provide some tips and techniques to help make the process a little easier.
The Pain Points of Tight Drawing
When it comes to tight drawing, many artists struggle with getting the proportions and details just right. It can be difficult to accurately capture the way fabric hugs the body, especially with more form-fitting clothing. Additionally, it can be challenging to create tight clothing that looks natural and not forced or uncomfortable on the character's body. These pain points can lead to frustration and discouragement, preventing the artist from achieving the desired result.
The Target of Tight Drawing
The goal of tight drawing is to accurately depict clothing that fits tightly on the character's body, without detracting from the overall aesthetic of the artwork. This can include anything from tight t-shirts and jeans to corsets and bodysuits. By mastering this technique, you can bring your characters to life and add a level of realism to your artwork that will leave viewers impressed.
Main Points of Tight Drawing
The key to successful tight drawing is to pay attention to the details. This includes things like understanding the way clothing drapes and following the natural curves and lines of the body. It's also important to pay attention to the fabric texture and understand how it interacts with light and shadow. In addition, using reference photos can help you get a better idea of how tight clothing should fit and look on the body.
Tips and Techniques
One of the best ways to improve your tight drawing skills is to practice drawing clothing with a lot of folds and wrinkles in them. This will help you understand the way the fabric naturally falls and crumples, and allow you to better recreate those shapes in your artwork. Additionally, try switching up the materials you're using. Experimenting with different brushes and pens can help create a more textured and realistic appearance.
Personally, I find it helpful to create a form-fitting base layer when drawing tight clothing. This allows me to add detail and dimension without worrying about accidentally making the clothing too baggy or loose. I also like to use reference photos when I'm struggling with a particular pose or fabric texture, as it can provide a better visual understanding of what I'm trying to achieve.
Finally, don't be afraid to experiment and make mistakes. Tight drawing is a skill that takes time and practice to master, so keep at it and don't get discouraged if your first few attempts don't turn out exactly as you planned.
Understanding Fabric Texture and Flow
When it comes to tight drawing, understanding fabric texture and flow is essential. This includes things like how the fabric interacts with light and shadow, as well as how it drapes and folds on the body. Paying attention to these details can help you create more realistic and natural-looking clothing in your artwork.
To better understand fabric texture and flow, try experimenting with different types of fabric and taking note of how they behave in different situations. This can be as simple as draping a t-shirt over your arm or watching how a skirt moves when someone walks. By paying attention to these small details, you can improve your overall understanding of fabric and create more believable and accurate artwork.
Making the Most of Reference Photos
Reference photos can be incredibly helpful when it comes to creating accurate and realistic tight clothing in your artwork. These can be photos that you take yourself or ones that you find online. When using reference photos, it's important to keep in mind that they should be used as a tool to better understand how clothing fits and flows, not as a crutch for copying directly.
Try using reference photos as a starting point, and then make adjustments and changes as necessary to fit your own artistic style and vision. This can include things like changing the color or fabric texture, or altering the overall shape and fit of the clothing. By using reference photos as a starting point, you can create more natural-looking and believable artwork.
Question and Answer
Q: What materials and tools are best for creating tight clothing in artwork?
A: When it comes to tight drawing, using a variety of materials and tools can be helpful. This can include things like fine-liner pens for creating detailed lines and textures, as well as washes and watercolors for creating a more textured and layered appearance. Additionally, using pencils and erasers can be useful for sketching out the basic form of the clothing before adding in details.
Q: How can I create a believable and natural-looking crease or fold in tight clothing?
A: Creating a believable crease or fold in tight clothing involves paying attention to the way the fabric naturally falls and folds. This can be done by observing real-life examples of similar clothing or by practicing drawing different types of folds and creases on paper. Additionally, using reference photos can be helpful for getting a better understanding of how fabric interacts with the body.
Q: How do I avoid making the clothing look too tight or uncomfortable on the character's body?
A: To avoid making the clothing look too tight or uncomfortable, it's important to pay attention to the natural curves and lines of the body. This includes things like the waist, hips, and bust, as well as the way the fabric naturally drapes on the body. Using reference photos can be helpful for getting a better understanding of how tight clothing should fit and look on the body, as well as where to add additional detail and texture to create a more natural and believable appearance.
Q: What are some common mistakes to avoid when drawing tight clothing?
A: Common mistakes when drawing tight clothing include creating clothing that is too tight or too baggy, placing folds and creases in unrealistic locations, and not paying attention to the way the fabric interacts with light and shadow. Additionally, not following the natural curves and lines of the body can lead to awkward and uncomfortable-looking clothing. When in doubt, it's always a good idea to use reference photos and take your time when creating the artwork.
Conclusion
In conclusion, tight drawing can be a challenging but rewarding skill to master. By paying attention to the details, understanding fabric texture and flow, and using reference photos, you can create artwork that accurately depicts and portrays tight clothing in a believable and natural way. Remember to be patient, practice consistently, and never be afraid to make mistakes or try new techniques.
Gallery
Tight Clipart 20 Free Cliparts | Download Images On Clipground 2022
Photo Credit by: bing.com / tight clipart pants clip clipground
Thick Thighsss In 2021 | Art Reference Poses, Art Reference Photos

Photo Credit by: bing.com /
Tight Outline For Classroom / Therapy Use - Great Tight Clipart
Photo Credit by: bing.com /
How To Draw Tight Clothing For Your Pin Up Characters
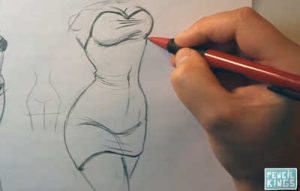
Photo Credit by: bing.com / tight clothing drawing draw hair stretching
Scarlett Johansson Tight Skirt - My Drawing : ScarlettJohansson
Photo Credit by: bing.com / johansson scarlett scarlettjohansson